How to Spot Poor Flooring Installation in Nevada Homes
Sep/15/2026 29How to Spot Poor Flooring Installation in Nevada Homes (And What to Do Next)
Walking across your living room shouldn’t come with unexpected squeaks, soft spots, or tripping hazards. Whether you just had new floors put in or bought a home with recent updates, noticing uneven boards or odd gaps can be frustrating. You invested hard-earned money into your home, and seeing signs of poor quality work raises immediate concerns about durability, safety, and hidden repair costs.
In Nevada, quality installation matters even more than in other parts of the country. Our intense summer heat, desert dryness, and drastic daily temperature drops put heavy stress on building materials. When a project rushes past proper prep work, the high-desert environment exposes those shortcuts fast.
This guide breaks down the exact warning signs of bad craftsmanship, explains why these issues happen, breaks down typical repair costs, and helps you decide when it is time to speak with a reliable floor installer.
7 Clear Signs of Poor Flooring Installation
Identifying a bad install early can save you thousands of dollars in compounding subfloor damage. Here are the seven most common red flags to look for around your home.
|
# |
Warning Sign |
Primary Cause |
|---|---|---|
|
1 |
Buckling or Cupping |
Missing expansion gaps; failure to acclimate |
|
2 |
Gapping Between Planks |
Extreme dry climate exposure; improper locking |
|
3 |
Hollow Sounds or Bounce |
Uneven subfloor; incorrect underlayment |
|
4 |
Uneven Transitions |
Rushed height matching; missing transition strips |
|
5 |
Peeling or Edge Lifting |
Cheap adhesive; improper subfloor cleaning |
|
6 |
Visible Nails or Glue |
Sloppy trim work; excessive adhesive usage |
|
7 |
Soft Spots Underfoot |
Rotten or unlevel subfloor beneath materials |
Buckling, Cupping, or Tenting Planks
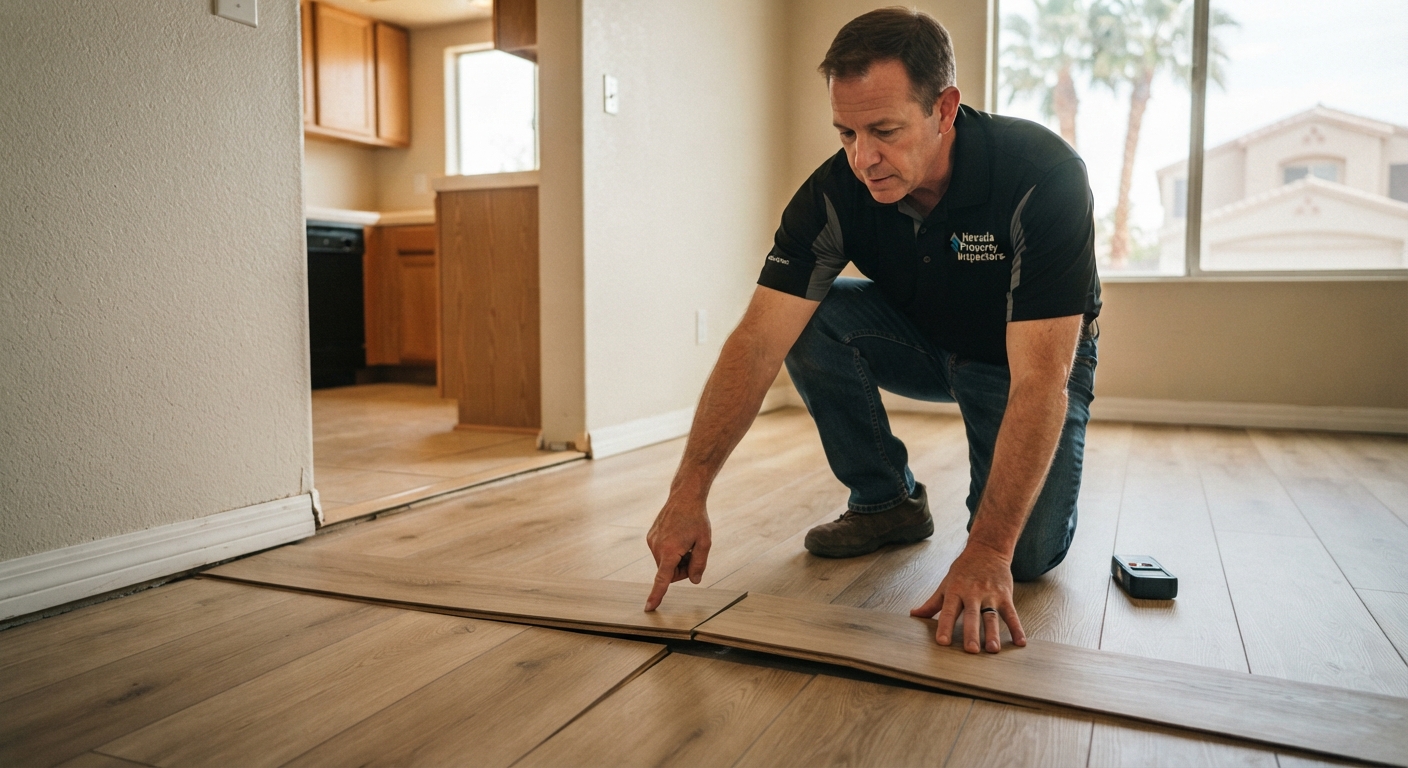
If your planks are pushing upward against each other to form a ridge (tenting) or curving up at the edges (cupping), the material is reacting to pressure or moisture without room to move.
All hard surface materials—especially engineered wood and laminate flooring—expand and contract as temperatures shift. Qualified installers leave a small expansion gap (usually 1/4 to 3/8 inch) along the perimeter of the room, hidden beneath the baseboards. If they butt the planks directly against the dry wall, the floor has nowhere to go when it expands except up.
Wide Gaps Between Boards
While buckling means the floor expanded into a tight space, wide gaps mean the planks are pulling apart. Small seasonal shifts are normal, but gaps wide enough to trap dirt or reveal the underlayment point to two main issues:
- Lack of Acclimation: The material was installed immediately after delivery without adapting to Nevada's low indoor humidity.
- Damaged Locking Systems: On floating floors, installers may have forced the tongue-and-groove joints together with too much force, breaking the locking mechanism.
Hollow Sounds, Creaking, or Excessive Bounce
When you step on a solid floor, it should feel firm and quiet. If walking across the room creates hollow "clacking" noises, loud squeaks, or a trampoline-like bounce, the subfloor beneath the finish material is uneven.
Nevada concrete slabs often feature small dips, bumps, or hairline settling cracks. A skilled professional grinds down high spots and fills low spots with self-leveling compound before laying down materials. Skipping subfloor prep leaves pockets of empty space under the boards.
Crooked Layouts and Misaligned Patterns
Stand at the entrance of a hallway or room and look down the seam line. The planks should run parallel to the longest wall or main focal point. If the lines angle noticeably toward one corner, or if grid patterns on tile drift off-center, the crew failed to snap reference chalk lines before laying the first row.
Awkward or Uneven Transitions
Where your hallway laminate meets bathroom tile or bedroom carpet, the transition should be flush, secure, and level. Signs of poor work include:
- Exposed raw edges on wood or laminate
- Trip hazards caused by abrupt height differences
- Loose transition strips that click or shift when stepped on
- Overuse of visible caulk to bridge height gaps
Peeling Edges on Luxury Vinyl or Tile
When vinyl planks or tiles lift at the corners, the issue usually traces back to adhesive failure. Common causes include using the wrong glue for Nevada's climate, laying adhesive on a dusty, unprimed concrete slab, or failing to roll the floor with a heavy weighted roller after placement.
Visible Glue Smears, Exposed Nails, or Damaged Trim
Take a close look at your baseboards and shoe molding. Sloppy installations often feature split wood trim from oversized finish nails, unmasked glue smears on pre-finished surfaces, or large gaps between the baseboard and the floor left unsealed.
What are the signs that you need a professional floor installer?
Quick Answer: You should call a professional floor installer if you notice widespread buckling, bouncy areas larger than a few square feet, water damage beneath planks, or flooring that trips family members. Major subfloor leveling and structural repairs require specialized tools and expert evaluation to prevent long-term property damage.
Why Nevada’s Climate Makes Flooring Installation Trickier
Installing floors in Nevada isn't the same as installing them in humid coastal environments or cold northern climates. Nevada's environment poses unique challenges that demand specific installation techniques.
|
Nevada Environmental Stressor |
Impact on Flooring |
|---|---|
|
Extreme Heat (100°F+) |
Accelerates adhesive drying times; expands materials |
|
Low Humidity (<20%) |
Shrinks wood/laminate; causes wide plank gaps |
|
Sudden Storms/Flash Floods |
Risks concrete slab moisture intrusion |
|
Temperature Swings |
Causes rapid expansion/contraction cycles |
Extreme Heat and Temperature Swings
During Nevada summers, indoor temperatures can spike dramatically if an air conditioner is turned off or set higher while homeowners are away. In sunrooms or areas near south-facing glass, direct sunlight can heat floor surfaces past 120°F. This thermal heat causes rapid material expansion. In winter, night temperatures drop quickly, causing materials to contract. Installers must account for these wide thermal ranges during layout design.
Very Low Humidity Levels
Nevada frequently sees relative humidity levels drop below 15%. Wood, bamboo, and laminate contain organic fibers that react to ambient moisture. When brought from a humid manufacturing facility or warehouse into a dry home, materials lose moisture and shrink.
Without proper acclimation—storing the unopened boxes inside the air-conditioned installation space for at least 48 to 72 hours prior to work—the flooring will shrink after installation, creating large, unsightly gaps across the room.
Concrete Slab Moisture Intrusion
Most homes in Southern and Northern Nevada are built on concrete slab foundations. While the desert surface looks dry, ground moisture can migrate upward through the porous concrete.
During seasonal flash storms, hydrostatic pressure increases. A common mistake made by inexperienced installers is skipping a moisture test or omitting a 6-mil poly vapor barrier under floating floors, leading to trapped moisture, mold, and adhesive breakdown.
Floating Floors vs. Glued/Nailed Down
How your floor was installed dictates how defects manifest and how easy they are to fix.
|
Feature |
Floating Floors |
Fixed (Glue/Nail Down) |
|---|---|---|
|
Attachment Method |
Planks lock together; float over underlayment without glue/nails |
Fastened directly to subfloor using nails, staples, or glue |
|
Common Materials |
Laminate, LVP, Engineered Wood |
Hardwood, Ceramic Tile |
|
Failure Signs |
Bouncing, hollow sound, tenting at room edges |
Popping, cracked grout, board separation |
|
Repair Complexity |
Moderate; planks can disengage from wall edges |
High; requires tearing up glued/nailed sections |
Floating Floors
Floating floors—including click-lock laminate, luxury vinyl plank (LVP), and some engineered woods—are not attached directly to the subfloor. Instead, individual planks lock together and rest over a foam or rubber underlayment.
- Advantages: Faster installation, built-in flexibility, easier to replace single damaged planks.
- Common Failure Point: Because the system "floats" as a single continuous sheet, any dip in the subfloor deeper than 3/16 inch over a 10-foot span causes the locking joints to flex, creak, and eventually snap under foot traffic.
Glued or Nailed Down Floors
Solid hardwood, traditional parquet, and ceramic tile are mechanically fastened or chemically bonded directly to the wood subfloor or concrete slab.
- Advantages: Extremely stable underfoot, long lifespan, solid sound reduction.
- Common Failure Point: If the installer uses the wrong trowel size, applies adhesive in low-humidity conditions past its open working time, or skips floor priming, whole sections can detach from the subfloor, creating hollow "popping" tiles or loose wood planks.
Can You Fix Poor Flooring Yourself or Should You Hire a Professional?
When you discover installation errors, deciding between a DIY weekend repair or contacting a professional depends on the scale and root cause of the defect.
When DIY Makes Sense
You can likely handle simple visual fixes if you have basic hand tools and patience:
- Replacing a single damaged LVP plank in the center of a floating floor using a suction cup or painter's tape technique.
- Re-attaching a loose transition strip with fresh screws or construction adhesive.
- Closing minor plank gaps on floating floors using a rubber mallet and a specialized floor tapping block.
- Replacing damaged baseboard shoe molding to better cover perimeter expansion gaps.
When to Call a Professional Floor Installer
You should contact a qualified local specialist if you encounter systemic problems:
- Widespread tenting or buckling covering multiple areas of a room.
- Persistent squeaks and deep bounces indicating subfloor dips that require leveling compounds or plywood sistering.
- Moisture damage, cupping, or mold growth under materials.
- Whole-house layout errors where room transitions are misaligned or doorways show raw gaps.
- Damaged locking joints across large areas of click-lock laminate or LVP.
How Much Does It Cost to Fix or Replace Poor Flooring in Nevada?
Understanding typical repair and replacement costs helps you budget effectively and evaluate contractor quotes with confidence.
|
Service Type |
Estimated Cost Range |
|---|---|
|
Minor Repair / Plank Replacement |
$150 – $400 total |
|
Subfloor Leveling & Prep |
$1.50 – $4.50 per sq. ft. |
|
Complete Removal of Old Flooring |
$1.00 – $2.50 per sq. ft. |
|
New Installation Labor Only |
$2.00 – $6.00 per sq. ft. |
|
Material + Labor (Laminate/LVP) |
$4.50 – $11.00 per sq. ft. |
|
Material + Labor (Tile/Hardwood) |
$8.00 – $20.00+ per sq. ft. |
Note: Final costs depend on room size, accessibility, material choices, subfloor condition, and local labor demand.
Key Factors That Influence Total Costs
- Subfloor Preparation Requirements: Grinding concrete high spots or applying self-leveling underlayment adds labor time and material expense, but it is necessary to protect your manufacturer warranty.
- Old Material Removal and Disposal: Tearing out old glued-down tile or carpet and hauling it to a Nevada disposal facility adds labor cost compared to laying a floating floor over clean, prepped subfloors.
- Room Layout Complexity: Simple rectangular living rooms cost less per square foot than staircases, rooms with multiple closets, diagonal layouts, or angled fireplaces requiring precise custom cuts.
- Moisture Mitigation: Applying specialized liquid epoxy moisture barriers to high-moisture concrete slabs increases material costs up front but prevents catastrophic flooring failure later.
What are typical labor rates for a floor installer in Nevada?
Quick Answer: Labor-only flooring rates in Nevada generally range from $2.00 to $6.00 per square foot for standard laminate flooring and luxury vinyl plank. Tile and solid hardwood installation labor typically ranges from $5.00 to $12.00+ per square foot due to the additional grinding, mortar mixing, setting, and grouting required.
How Long Does a Professional Flooring Project Take?
Knowing the timeline helps you plan household routines, pet accommodations, and work-from-home arrangements.
- Single Room (200–400 sq. ft.): 1 to 2 days for complete installation, including subfloor prep and trim work.
- Whole House (1,500–2,500 sq. ft.): 3 to 5 business days for standard LVP or laminate. Hardwood or large-format tile may require 5 to 8 days to allow for adhesive curing and grout drying.
- Subfloor Leveling Extra Time: If self-leveling concrete poured over a slab is required, it must cure for 12 to 24 hours before installers can lay materials over it.
How to Choose a Reliable Flooring Contractor in Nevada
Selecting the right professional prevents repeat installation errors and ensures your project runs smoothly from start to finish.
1. Verify Nevada Licensing and Insurance
In Nevada, contractors must be properly licensed by the Nevada State Contractors Board (NSCB) for projects exceeding specific monetary thresholds. Licensed contractors carry required worker's compensation insurance and general liability coverage, protecting you from personal financial liability if a worker is injured inside your home.
2. Ask About Subfloor Prep and Acclimation Policies
During your initial consultation, ask the contractor explicitly:
- "How do you test concrete slab moisture before laying down materials?"
- "How many days will you allow the materials to acclimate inside my air-conditioned space before installation starts?"
- "Is subfloor grinding and leveling included in this written estimate, or is that billed separately if discovered later?"
A qualified local contractor will answer these questions clearly and outline their standard prep steps without hesitation.
3. Review Itemized Written Estimates
Avoid contractors who offer a single lump-sum number scribbled on a business card. Request a clear, line-item bid breaking down:
- Cost per square foot for material vs. labor
- Underlayment specifications and thickness
- Moisture barrier inclusions
- Transition strips, shoe molding, and baseboard work
- Furniture moving and old material haul-away fees
4. Check Recent Workmanship Warranties
Reputable installers stand behind their labor. Look for a written workmanship warranty covering installation defects (separate from the material manufacturer warranty) for at least 1 to 2 years after completion.
Questions to Ask a Contractor Before Signing a Contract
Before signing an agreement or paying an initial deposit, ask these essential questions:
- Are you directly employing your crew, or using sub-contractors? (Ensures consistent work quality and clear accountability).
- What brand and thickness of underlayment do you recommend for my subfloor type? (Ensures adequate sound deadening and cushioning).
- How will you handle doorways and transitions between different flooring types? (Prevents raw edges and awkward trip hazards).
- What is your daily cleanup protocol during the project? (Keeps construction dust and debris controlled, especially in lived-in homes).
- What steps do you take if you discover rotten subfloor or cracked concrete after tearing up the old material? (Establishes clear communication for change orders before extra work begins).
Mistakes Homeowners Should Avoid
- Skipping Materials Acclimation: Forcing a crew to install wood or laminate the same day it is delivered from a hot delivery truck virtually guarantees future gapping or buckling.
- Choosing Materials Based Only on Looks: Installing cheap laminate in high-moisture bathrooms or unconditioned sunrooms leads to swollen plank edges and premature failure.
- Re-using Damaged or Old Underlayment: Saving a few dollars by keeping old, compressed foam underlayment compromises sound absorption and reduces plank support.
- Paying 100% Upfront: Never pay the full contract balance before the project is completed, inspected, and approved by you. Standard industry practices involve a modest deposit for materials, with the remaining balance due upon completion.
Frequently Asked Questions About Nevada Flooring Installation
How long should laminate flooring acclimate in Nevada before installation?
Laminate flooring should acclimate inside the air-conditioned home for a minimum of 48 to 72 hours prior to installation. The boxes should be laid flat in the center of the room with the plastic wrapping opened at the ends to allow dry desert air to circulate evenly around the planks.
What is the best type of flooring for high heat and low humidity in Nevada?
Luxury Vinyl Plank (LVP) and tile (porcelain or ceramic) perform exceptionally well in Nevada's dry, warm climate. High-quality rigid core LVP is 100% waterproof, highly resistant to dimensional expansion from humidity swings, and handles thermal heat better than budget laminate or solid hardwood.
Why is my floating floor bouncing when I walk on it?
A bouncing floating floor means the installer laid planks over an unlevel subfloor without filling low spots or grinding high spots first. The empty space beneath the underlayment flexes downward under your body weight, placing stress on the plank joints.
How do I know if my concrete slab has too much moisture for new floors?
A professional floor installer conducts a calcium chloride test or uses a digital pinless moisture meter on the concrete slab. If moisture emissions exceed 3 lbs per 1,000 sq. ft. over 24 hours, a specialized liquid moisture barrier or heavy-duty polyethylene membrane must be applied before installing finish materials.
Can bad flooring installation ruin the material warranty?
Yes. Material manufacturers maintain strict written guidelines regarding expansion gaps, subfloor flatness tolerances (typically 3/16 inch over 10 feet), and moisture testing. If an inspector determines that a product failed due to improper installation or missing underlayment, the manufacturer will void the product warranty.
Is it normal to have small gaps in hardwood floors during winter?
In Nevada's dry winter months, slight hairline separation between solid wood planks can occur as indoor heating systems lower humidity levels further. However, gaps wider than a dime or gaps that remain open year-round indicate a failure to acclimate the wood properly during installation.
How do I fix squeaky spots under my new floors?
Squeaks happen when subfloor panels rub against floor joist nails or when plank locking joints rub together over low spots. Fixing persistent squeaks usually requires lifting the affected section, securing the subfloor to joists with subfloor screws, leveling the dip, and reinstalling the surface planks.
Take the Next Step Toward Beautiful, Durable Floors
Spotting installation errors early gives you the power to address issues before they cause permanent subfloor damage or void material warranties. Your home should be a comfortable, safe space, and your floors ought to withstand daily life with ease.
If you suspect your current floors were installed incorrectly, or if you are planning a new flooring upgrade and want the job done right the first time, getting an expert opinion is a practical next step. A qualified local floor installer can inspect your subfloors, perform accurate moisture readings, evaluate transitions, and provide a clear, itemized estimate tailored to your home.
Need a professional eye on your floors? Don't let bad installation compromise your home's comfort and value. Click here to connect with top-rated, licensed flooring contractors in Nevada for a no-obligation inspection and accurate project estimate.
Please visit us here to find Find top-rated service pros for your project or call us at 1 (888) 646-7358!